I’ve discussed why mailing lists are important and I’ve shared about the ins and outs of using Mailchimp, but there’s one crucial piece to effectively utilizing a mailing list that I haven’t covered quite yet: autoresponders.
It seems too simple, but email automation is one of the most effective ways to gain the email addresses of those who are truly interested in your products and services. In fact, one survey by the Lenskold Group and the Pedowitz Group says that automation increased the quality of leads that get passed to sales by 60% (source).
Autoresponders also help solve many problems within your business. Have you ever wondered how to automatically send a welcome message, freebie, or recent newsletter to new email subscribers? Maybe you’re interested in setting up a marketing campaign for recent customers or creating an email workflow for your clients.
If any of the above grabs your attention, today’s post is for you. I’m explaining the ins and outs of using autoresponders as well as some creative ways to use them for your business. Then I’ll take you behind the scenes for a how-to on setting up autoresponders in Mailchimp.
But first, what is an autoresponder?
An autoresponder is a workflow for your mailing list. It’s usually set up as an email or a series of emails that are focused on a particular topic and delivered on a schedule. The process usually begins when someone subscribes to your mailing list, and emails are sent out in a planned series of intervals.
For example, each time that a new subscriber joins the Elle & Company mailing list, they’re immediately sent a copy of the latest weekly newsletter. We do that by updating the email within our autoresponder workflow for the newsletter on a weekly basis.
Why autoresponders are helpful
They help organize your workflow
While it might require a lot of work at the outset, organizing your emails through an autoresponder will streamline your workflow in the long run. By sitting down and thinking through each email within your sequence ahead of time, you’ll be thanking yourself later.
They also do the hard work for you. Once you go through the time-consuming task of setting them up, they’re good to go. You don’t have to worry about keeping up with dates to send emails or remembering their sequence; the autoresponders have you covered.
They demonstrate intentionality and professionalism
I’m always impressed by businesses who thoughtfully schedule emails and autoresponders. It shows me that they’re organized, strategic, and intentional, and it demonstrates their attention to detail. Autoresponders make a business seem professional and legitimate.
They build trust with your audience
Like blogging, it’s important to follow the 90/10 here, too: 90% useful content, 10% promotional content. While you might be seeking new emails and leads which could lead to sales and bookings, you won’t get there by promoting yourself the majority of the time. There has to be something in it for your audience in order for them to continue to follow along (and even sign up in the first place). Consider their needs.
Autoresponders can also help warm a potential customer up to purchasing something from you in the future. When you share content that benefits your audience, you’re bound to gain their trust and improve their user experience. And fostering trust is the key to selling products and booking services.
Creative ways to use autoresponders
- Send a welcome message, freebie, and/or your latest newsletter to new subscribers who sign up for your mailing list
- Improve your client experience by setting up an email workflow with links to a project page, client homework, and helpful blog posts on your site
- Follow up with past customers by setting up an autoresponder with a questionnaire that can be sent weeks or months after their purchase
- Create a free e-course through a series of emails that walks subscribers through an area of your niche in order to gain emails and possibly sell a product/service at the end of the campaign
- Upsell your products by setting up an email that follows up with previous customers and promotes the purchase of a second product
- Introduce new subscribers to your best blog posts and drive traffic back to your site
Another great thing about autoresponders? You can have several running at the same time and tailor them to specific audiences within your niche.
For example, we have the autoresponder set up for our newsletter, but we’re also in the process of setting up email workflows for those who sign up for our opt-ins on my design services page, consultation page, and e-course pages. This will allow us to set up intentional autoresponders that are tailored to the people who would be interested in those offerings, hopefully leading to more bookings and sales.
How to set up an autoresponder in MailChimp
Before I jump in to the tutorial, it’s important to note that autoresponders aren’t included in the free version of Mailchimp. In order to utilize this workflow feature for your mailing lists, you must sign up for a monthly account or purchase email credits. You can learn more about their pricing here.
It's also important to note that this is one of many options for setting up autoresponders in Mailchimp.
Log into your Mailchimp account and select Automation from the top navigation bar.
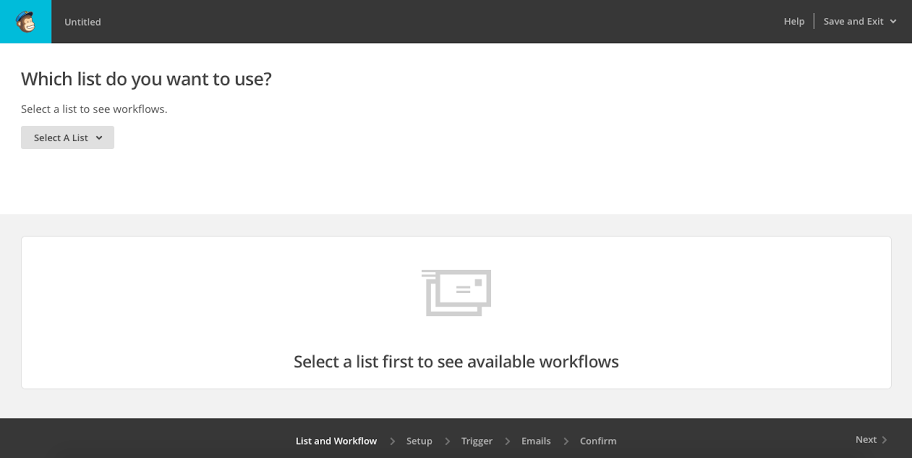
Click the Create Automation Workflow in the top right corner of the window. That should take you to this page:
Once you’re there, you’ll be required to select a mailing list for the automation. Choose your preferred list and click the Next button in the bottom right corner.
Next, scroll down and select Welcome Message. This will send a single message to new subscribers once they’ve signed up for your newsletter.
Once you’ve named your automation workflow and looked through the tracking options, Mailchimp will ask you to Configure Trigger. This helps you set up the parameters after someone subscribes to your list. If you’re just hoping to set up a welcome email, I would recommend choosing the option that sends the email immediately after a new subscriber is added to the list.
Next, click on Automation Email #1. It will take you to a screen that looks like something similar to this:
Sidenote: Subscribers won't see what you name your email; they will only see the email subject. The name of your email is purely for your reference.
Once you've named the email and selected the email address that you would like the message to be sent from, click Next.
This page allows you to do one of two things: Start from scratch with a new template or select an existing email by clicking Campaigns in your top navigation.
Once you've worked through setting up your campaign, Mailchimp will bring you back to the Automation Workflow page with your selected email. Make sure to double-check the delay to ensure that the email will be sent out at the appropriate time.
Click Next at the bottom of the screen, review your automation, confirm, and voila! Your selected email will be sent once someone subscribes to your newsletter.
Autoresponders are a simple way to gain potential customers and clients, streamline your workflow, build trust with your audience, and drive more traffic to your site.
How do you utilize autoresponders for your business? Which email marketing platform do you prefer?

